Understanding Dynamic Routes and Route Paths in React JS (Building a simple picture gallery app)


I started needing dynamic routes when I began working on a complex e-commerce web application ( which I'm still building at the moment ). I needed a details page and a profile page where my site users would be able to view the unique details of a particular product when they clicked on it, or have a unique profile after registration. I couldn't just create these pages individually because several things came into play, what if a new product is added? would I have to hard code a new details page? what if a new user registers? would I have to hard code the new user's profile (😅)? this would be too much work and wouldn't even be realistic. So I went searching and discovered ( actually, it was shown to me by a code mentor of mine after narrating my problem) the dynamic route pattern in ReactJs (which is my favorite JavaScript library), and it was really cool to use, saved a lot of stress, and not so difficult to implement.
In this tutorial, I'll show you how it is done and we will build a simple web application together where we create a picture gallery app.
TABLE OF CONTENTS
Creating A New React ApplicationInstalling DependenciesCreating our filesSetting Up React-Router-DOMApplication ConceptCreating An Array Of Objects to Contain our Pictures and Details on Each PictureAdding BootstrapUsing the .map array method to Display all Contents from our Array in index.jsxManipulating Dynamic Contents with PropsSprinkle Some Css Love - Just Add MagicConclusion
PREREQUISITES
- Knowledge of ReactJs is necessary.
- A little knowledge of JavaScript objects is required.
- I'll use a little bootstrap here, so it's nice to have a little knowledge of it too.
- I'll use destructuring and the
.map()array method. It's nice to know too. - You, your computer, and attentiveness.
Let's Get Started!
To get the finished product, you could go to the repository on github, clone it, and run
npm installto install the dependencies. But if you'll like to follow step by step ( which I encourage), proceed. Or you could do BOTH!😊🔥
Creating A New React Application
This phase is boring and I know you know this by now. Run the following command in your terminal to create a new react app :
create-react-app picture_viewer
Voila! your app has been created with the name picture_viewer. you navigate to the folder by running
cd picture_viewer
and run
npm start
to start your application and view it in your browser. You've successfully created a React application!
If you use VsCode like me, you could run the following command from you new project directory in the terminal to open it on your code editor
code .
At this point, here is what our folders structure looks like There are few files we won't be needing, so let's get rid of them
- App.test.js
- App.css
- logo.svg -serviceWorker.js -index.css
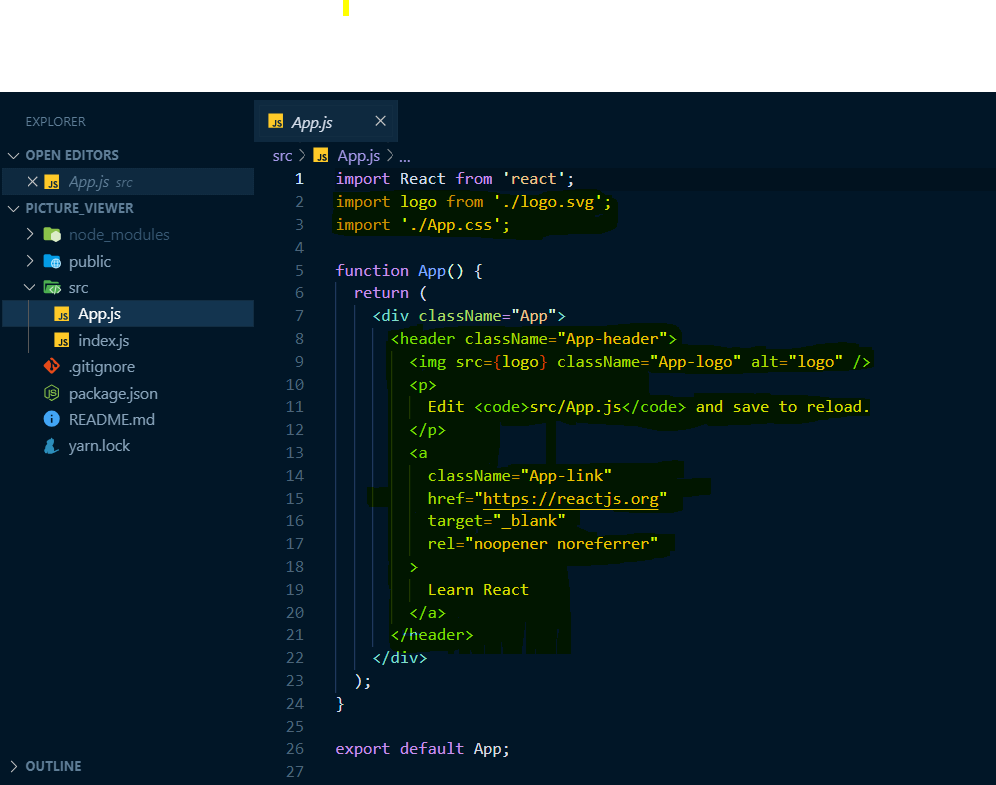
Let's now go into our app.js file and clear it up a little.
Everything highlighted in the picture below should be removed
> Now go to the
index.jsfile and replace everything in the file with this:import React from 'react'; import ReactDOM from 'react-dom'; import App from './App'; ReactDOM.render(<App />, document.getElementById('root'));We've successfully completed the first section on Creating A New React Application. Brace yourself for the journey ahead 🔥
Installing Dependencies
There is only one dependency we would be needing
- React Router DOM
since we would want to create dynamic routes, we would need to device a way to route first. Makes sense, right? That's where the react-router-dom package comes in. It is the default package in react for handling routing. you could read more about it from the official documentation HERE.
To install, run :npm install react-router-dom
Creating our files
We would need to create a new folder inside our src folder called pages. This folder would hold all the pages we would have in the entire application. Create two files inside the pages folder including:
imageDetail.jsxindex.jsx> our
index.jsxfile is going to be the default file and serve as a homepage for our application, this is where all our collection of images would be displayed. While, theimageDetail.jsxfile is going to hold the detail of each individual image in the collection, this is the page we are going to be displaying dynamically with a dynamic path too. > Next, we would need to write basic code in our two newly created components, this won't be permanent, this would just serve to enable us to avoid getting an error and to help us configure routing.
here's how our two files should look like after adding the basic code:index.jsx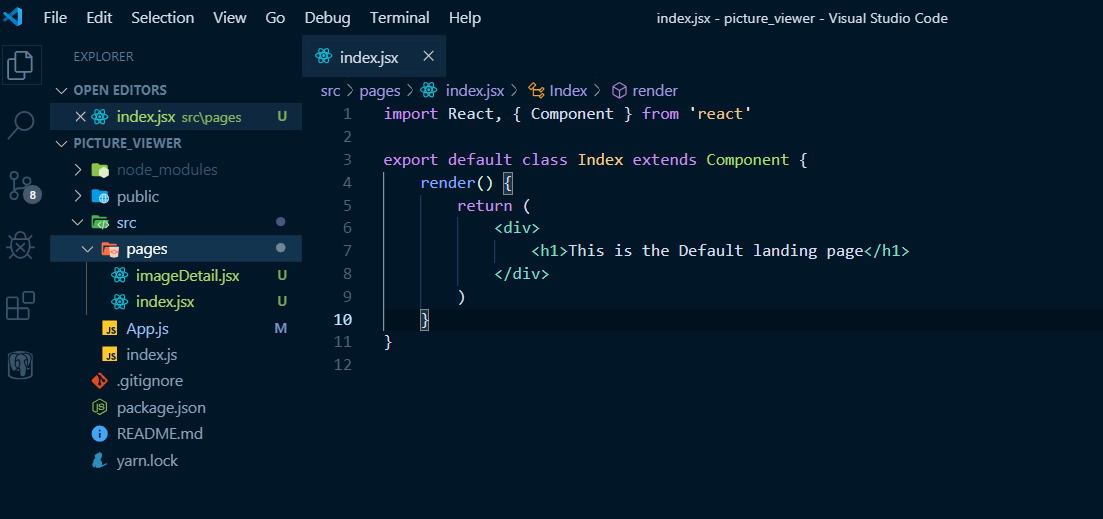
imageDetail.jsx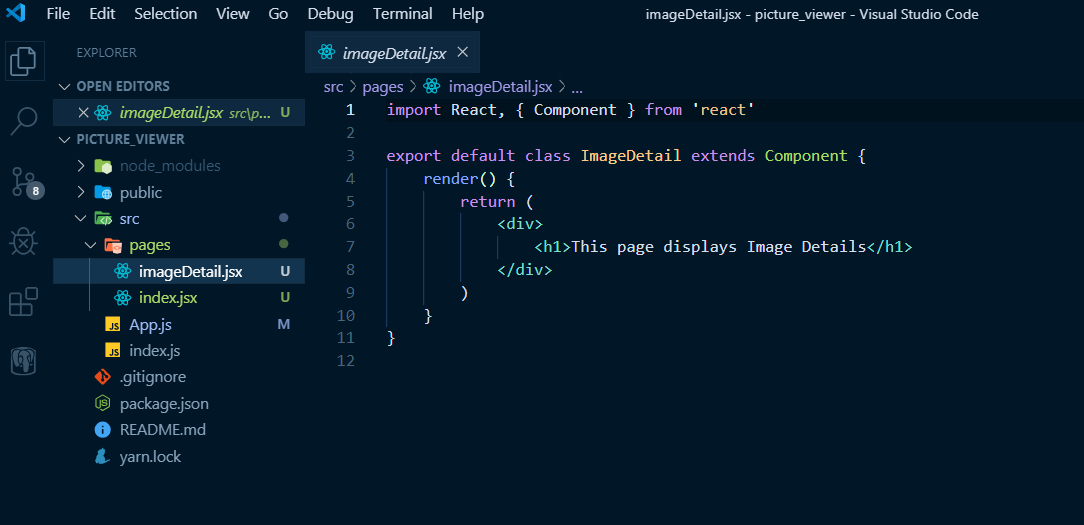
if you use VsCode you could type
rccand click enter or tab to generate a class-based component boilerplate as in the images above ( that is after you must have downloaded the React extension)
Setting Up React-Router-DOM
In a previous section, we installed the react-router-dom as a package dependency for our project. Now it is time to set up those routes. Here's a brief on what we will do: we just created two pages, this means that we would create two routes, the first route would go to the index.jsx page, while the other one would go to the imageDetail.jsx page. Our second route would be made in a way to have a path that would be dynamic.
Let's Begin
first, we navigate to the index.js file in our root directory. This file seems to be the highest component. You should be used to react and you know by how this works. Let's import browserRouter from react-router-dom in our index.js file, like this:
import { BrowserRouter } from 'react-router-dom'
Next, we would wrap our App inside the BrwoserRouter we just imported. This basically means that we now have the ability to construct routes inside our app. Let's do it this way:
const app = <BrowserRouter> <App /> </BrowserRouter>
we stored this in a constant and now we can simply inject the variable app into our render() method instead of <App/>. The whole thing should look like this now:
import React from 'react';
import ReactDOM from 'react-dom';
import App from './App';
import {BrowserRouter} from 'react-router-dom'

const app = <BrowserRouter> <App /> </BrowserRouter>

ReactDOM.render( app, document.getElementById('root'));
Creating Our Routes
Now that we have configured react-router-dom, and made it available for use,let's go ahead and create the two routes we mentioned earlier. We would be doing this in the app.js file.
So first, navigate to the app.js file and replace the present code with this:
import React from 'react';
import IndexRoute from './pages/index';
import ImageDetailRoute from './pages/imageDetail';
import {Switch, Route} from 'react-router-dom'
function App() {
  return (
    <div className="App">
      <Switch>
        <Route exact path="/" component = {IndexRoute} />
        <Route path="/image/:name" render={ props => <ImageDetailRoute {...props} /> } />
      </Switch>
    </div>
  );
}

export default App;
> So here's what we just did:
we used theimportstatement to import our two components into theapp.jscomponent. Next, we importSwitchandRoutefromreact-router-dom, basically if you've used react before now and you've configured routing, this would be pretty much normal to you by now. TheSwitchgoing to wrap all these individual routes that we might have on our web application (in our case, we have just two). the route we would be paying a close look to would be the second route<Route path="/image/:name" render={ props => <ImageDetailRoute {...props} /> } />This is the route we would be displaying dynamically, and you'll notice that it has some interesting features.
here's one:
path="/image/:name"
I'll try to explain this in the simplest way I could think of. Here we are simply saying that our path to the image component should be/image/and whatever dynamic name that is passed unto it. Here, the:namerepresents a dynamic content that would be passed unto it. you'll understand more as we proceed.Next, lets look at the second half of that Route:
render={ props => <ImageDetailRoute {...props} /> }Here instead of using the
componentattribute to hold the component, we use therenderattribute. Why is this?
Well, therenderattribute allows us to pass in a function that takes props as our parameter and make these props available for use in our component. So the main props we want to be accessing from here would be the/:name, as this would enable us to find dynamic content on our component based on their names later in this tutorial.
Application Concept
Now that we have come this far, let's pause, and remind ourselves what exactly we are building. We are building a photography application where people could come to see photos and the photographer's name. when any photo is clicked, our app should be able to display a dynamic page with more details on that specific photo clicked on. Sweet and simple, right?
Now that we have successfully set up our routing, let us quickly move ahead and finish the rest of this app.
Creating An Array Of Objects to Contain our Pictures and Details on Each Picture
Think about this, normally we might have an API that returns the list of images together with their details in an array of objects, from a database, right? But, we are not going to set all these up, instead, we'll create a javascript file and put in an array of different image objects in it.
- First, create a file in your root directory, with the name
imgArray.js - copy and paste this code into your newly created file
>
const imgArray = [
  {
    name: "Splendor",
    image: "http://onebigphoto.com/uploads/2011/12/magnificent-peacock.jpg",
    description:
      "Lorem ipsum dolor sit amet, consectetur adipiscing elit, sed do eiusmod tempor incididunt ut labore et dolore magna aliqua. Ut enim ad minim veniam, quis nostrud exercitation ullamco laboris nisi ut aliquip ex ea commodo consequat. Duis aute irure dolor in reprehenderit in voluptate velit esse cillum dolore eu fugiat nulla pariatur.Lorem ipsum dolor sit amet, consectetur adipiscing elit, sed do eiusmod tempor incididunt ut labore et dolore magna aliqua. Ut enim ad minim veniam, quis nostrud exercitation ullamco laboris nisi ut aliquip ex ea commodo consequat. Duis aute irure dolor in reprehenderit in voluptate velit esse cillum dolore eu fugiat nulla pariatur.",
    photographer: "Mirabella"
  },
  {
    name: "Natural",
    image:
      "https://i0.wp.com/areomagazine.com/wp-content/uploads/2019/07/espen-willersrud-GlHKd5I4SkY-unsplash.jpg?fit=1920%2C1280&ssl=1",
    description:
      "Lorem ipsum dolor sit amet, consectetur adipiscing elit, sed do eiusmod tempor incididunt ut labore et dolore magna aliqua. Ut enim ad minim veniam, quis nostrud exercitation ullamco laboris nisi ut aliquip ex ea commodo consequat. Duis aute irure dolor in reprehenderit in voluptate velit esse cillum dolore eu fugiat nulla pariatur.Lorem ipsum dolor sit amet, consectetur adipiscing elit, sed do eiusmod tempor incididunt ut labore et dolore magna aliqua. Ut enim ad minim veniam, quis nostrud exercitation ullamco laboris nisi ut aliquip ex ea commodo consequat. Duis aute irure dolor in reprehenderit in voluptate velit esse cillum dolore eu fugiat nulla pariatur.",
    photographer: "Johnny"
  },
  {
    name: "Brave",
    image:
      "https://store-images.s-microsoft.com/image/apps.58792.68457814095533373.a0576f2d-8e71-4ce4-90fa-c24d8fc99462.6b0ff4ae-7c30-489b-9cfa-c0b78c259b74?mode=scale&q=90&h=1080&w=1920",
    description:
      "Lorem ipsum dolor sit amet, consectetur adipiscing elit, sed do eiusmod tempor incididunt ut labore et dolore magna aliqua. Ut enim ad minim veniam, quis nostrud exercitation ullamco laboris nisi ut aliquip ex ea commodo consequat. Duis aute irure dolor in reprehenderit in voluptate velit esse cillum dolore eu fugiat nulla pariatur.Lorem ipsum dolor sit amet, consectetur adipiscing elit, sed do eiusmod tempor incididunt ut labore et dolore magna aliqua. Ut enim ad minim veniam, quis nostrud exercitation ullamco laboris nisi ut aliquip ex ea commodo consequat. Duis aute irure dolor in reprehenderit in voluptate velit esse cillum dolore eu fugiat nulla pariatur.",
    photographer: "Daniel Don"
  },
  {
    name: "Sharp",
    image:
      "https://i2.wp.com/o.aolcdn.com/hss/storage/midas/924f8c548a89da6953a9022d8038fcd/200072281/relics_jimgolden.jpg",
    description:
      "Lorem ipsum dolor sit amet, consectetur adipiscing elit, sed do eiusmod tempor incididunt ut labore et dolore magna aliqua. Ut enim ad minim veniam, quis nostrud exercitation ullamco laboris nisi ut aliquip ex ea commodo consequat. Duis aute irure dolor in reprehenderit in voluptate velit esse cillum dolore eu fugiat nulla pariatur.Lorem ipsum dolor sit amet, consectetur adipiscing elit, sed do eiusmod tempor incididunt ut labore et dolore magna aliqua. Ut enim ad minim veniam, quis nostrud exercitation ullamco laboris nisi ut aliquip ex ea commodo consequat. Duis aute irure dolor in reprehenderit in voluptate velit esse cillum dolore eu fugiat nulla pariatur.",
    photographer: "Chiagozielam"
  },
  {
    name: "Exquisite",
    image:
      "https://exquisiteandelegantevents.com/files/2018/10/alasdair_elmes_682868_unsplash_2_.jpg",
    description:
      "Lorem ipsum dolor sit amet, consectetur adipiscing elit, sed do eiusmod tempor incididunt ut labore et dolore magna aliqua. Ut enim ad minim veniam, quis nostrud exercitation ullamco laboris nisi ut aliquip ex ea commodo consequat. Duis aute irure dolor in reprehenderit in voluptate velit esse cillum dolore eu fugiat nulla pariatur.Lorem ipsum dolor sit amet, consectetur adipiscing elit, sed do eiusmod tempor incididunt ut labore et dolore magna aliqua. Ut enim ad minim veniam, quis nostrud exercitation ullamco laboris nisi ut aliquip ex ea commodo consequat. Duis aute irure dolor in reprehenderit in voluptate velit esse cillum dolore eu fugiat nulla pariatur.",
    photographer: "Sarah"
  },
  {
    name: "Waters",
    image:
      "https://1843magazine.static-economist.com/sites/default/files/styles/article-main-image-overlay/public/DSCF7443.jpg",
    description: "",
    photographer: "Mirabella"
  },
  {
    name: "Everyday-Life",
    image:
      "https://www.redwallpapers.com/public/redwallpapers-large-thumb/grayscale-photo-of-people-walking-in-the-street-free-stock-photo-image-wallpaper.jpeg",
    description:
      "Lorem ipsum dolor sit amet, consectetur adipiscing elit, sed do eiusmod tempor incididunt ut labore et dolore magna aliqua. Ut enim ad minim veniam, quis nostrud exercitation ullamco laboris nisi ut aliquip ex ea commodo consequat. Duis aute irure dolor in reprehenderit in voluptate velit esse cillum dolore eu fugiat nulla pariatur.Lorem ipsum dolor sit amet, consectetur adipiscing elit, sed do eiusmod tempor incididunt ut labore et dolore magna aliqua. Ut enim ad minim veniam, quis nostrud exercitation ullamco laboris nisi ut aliquip ex ea commodo consequat. Duis aute irure dolor in reprehenderit in voluptate velit esse cillum dolore eu fugiat nulla pariatur.",
    photographer: "Fling Stone"
  },
  {
    name: "Gadgets",
    image:
      "https://cdn.vox-cdn.com/thumbor/HOBzegwV2CJRJDWJyh71nYq8gEE=/0x0:2625x1907/1200x800/filters:focal(1103x744:1523x1164)/cdn.vox-cdn.com/uploads/chorus_image/image/52187575/jbareham_160418_0931_0086_FINAL_NO_BUFFER_5MB_02.0.0.jpeg",
    description:
      "Lorem ipsum dolor sit amet, consectetur adipiscing elit, sed do eiusmod tempor incididunt ut labore et dolore magna aliqua. Ut enim ad minim veniam, quis nostrud exercitation ullamco laboris nisi ut aliquip ex ea commodo consequat. Duis aute irure dolor in reprehenderit in voluptate velit esse cillum dolore eu fugiat nulla pariatur.Lorem ipsum dolor sit amet, consectetur adipiscing elit, sed do eiusmod tempor incididunt ut labore et dolore magna aliqua. Ut enim ad minim veniam, quis nostrud exercitation ullamco laboris nisi ut aliquip ex ea commodo consequat. Duis aute irure dolor in reprehenderit in voluptate velit esse cillum dolore eu fugiat nulla pariatur.",
    photographer: "Daniel Don"
  },
  {
    name: "Beauty",
    image:
      "https://pbs.twimg.com/profile_images/1153052818468737026/hqeHshCl_400x400.jpg",
    description:
      "Lorem ipsum dolor sit amet, consectetur adipiscing elit, sed do eiusmod tempor incididunt ut labore et dolore magna aliqua. Ut enim ad minim veniam, quis nostrud exercitation ullamco laboris nisi ut aliquip ex ea commodo consequat. Duis aute irure dolor in reprehenderit in voluptate velit esse cillum dolore eu fugiat nulla pariatur.Lorem ipsum dolor sit amet, consectetur adipiscing elit, sed do eiusmod tempor incididunt ut labore et dolore magna aliqua. Ut enim ad minim veniam, quis nostrud exercitation ullamco laboris nisi ut aliquip ex ea commodo consequat. Duis aute irure dolor in reprehenderit in voluptate velit esse cillum dolore eu fugiat nulla pariatur.",
    photographer: "Miracle"
  },
  {
    name: "Leaves",
    image:
      "https://picjumbo.com/wp-content/uploads/leaf-leaves-background-free-photo-DSC04946-2210x1473.jpg",
    description:
      "Lorem ipsum dolor sit amet, consectetur adipiscing elit, sed do eiusmod tempor incididunt ut labore et dolore magna aliqua. Ut enim ad minim veniam, quis nostrud exercitation ullamco laboris nisi ut aliquip ex ea commodo consequat. Duis aute irure dolor in reprehenderit in voluptate velit esse cillum dolore eu fugiat nulla pariatur.Lorem ipsum dolor sit amet, consectetur adipiscing elit, sed do eiusmod tempor incididunt ut labore et dolore magna aliqua. Ut enim ad minim veniam, quis nostrud exercitation ullamco laboris nisi ut aliquip ex ea commodo consequat. Duis aute irure dolor in reprehenderit in voluptate velit esse cillum dolore eu fugiat nulla pariatur.",
    photographer: "Lexa"
  }
];
export default imgArray;
Now, that we've created our array of objects and exported it, let's move ahead and add bootstrap to our project.
Adding Bootstrap
So instead of installing bootstrap as a package dependency for our project, we would just load the bootstrap-css from a CDN since that's all we will be needing. Now navigate topublic > index.html
and add this link tag to the head element.
<link href="https://stackpath.bootstrapcdn.com/bootstrap/4.3.1/css/bootstrap.min.css" rel="stylesheet" integrity="sha384-ggOyR0iXCbMQv3Xipma34MD+dH/1fQ784/j6cY/iJTQUOhcWr7x9JvoRxT2MZw1T" crossorigin="anonymous">
Yay! bootstrap-css is loaded and ready for use.
Using the .map array method to Display all Contents from our Array in index.jsx
Now, we start creating our layouts for the pages > index.jsx file. We are going to use the bootstrap grid system to create a three-column grid and use the bootstrap card to arrange our contents accordingly. I am not going to go on and on explaining bootstrap, if you don't know how to use bootstrap go ahead and read up on this with these links:
- bootstrp grid system
- bootstrap cards
Now, copy and paste the code below and replace what you have in yourindex.jsxfile at the moment.import React, { Component } from "react"; import imageArr from "../imgArray"; import { Link } from "react-router-dom"; import "./style.css" export default class index extends Component { render() { return ( <div className = "index-container"> <h1 id= "index-title">We Talk Photography!!</h1> <div className="row container"> {imageArr.map(({ name, photographer, image }) => ( <div className="col-sm-10 col-md-3 col-lg-4"> <div className="card " style={{ width: "18rem" }}> <img src={image} className="card-img-top" alt="..." /> <div className="card-body"> <h5 className="card-title">{name}</h5> <p> <b>Photographer: </b> {photographer} </p> <Link to={`/image/${name}`} className="btn btn-primary"> Details </Link> </div> </div> </div> ))} </div> </div> ); } }
Here's what we are doing here:
- we import the
ImageArrwhich we created earlier - we import
Linkfromreact-router-dom. This would enable us link to the individual details page, (you compare it to the<a><a/>element if it was to be an html code) - we create a
divwith the className ofrow(this follows the bootstrap pattern of creating grids with multiple columns) - we map through the
imageArrand use destructuring to pull out our value from each object in our array. - now we create our
columninside themapmethod. We only have to create one column using the values we destructured from the array. This is because, since our column is inside of amapmethod, for every object in our array, it creates a column with the same definition for it. Cool right? We don't have to worry about creating multipledivsfor each object in our array, we just create one that loops through every object and creates acolumnfor it with the same definitions. - Now let's pay close attention to this line:
<Link to={`/image/${name}`} className="btn btn-primary"> Details </Link>Linkwe imported and we link to the detail page for each image. You'll notice that we passed the destructuredname(which we got from the object) into the route path. Later on, we would see how to display dynamic content on the page usingpropsbased on the name passed into the route path.
Here's what our site should look like at the moment: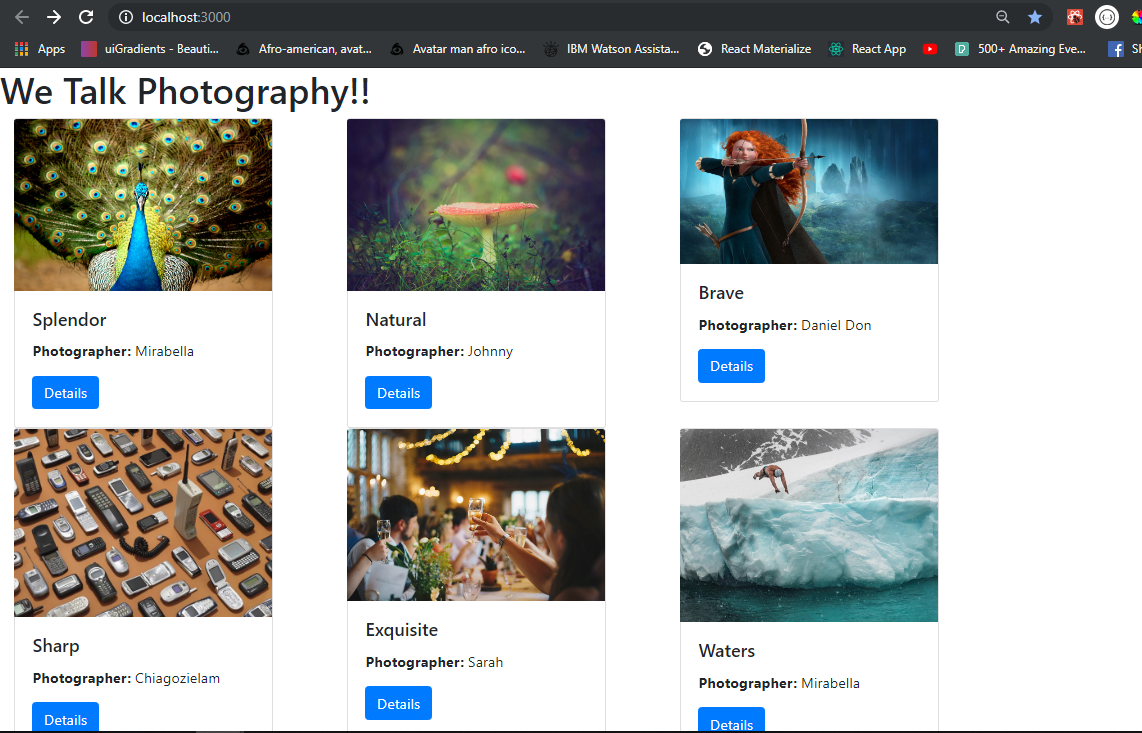
Maniulating Dynamic Contents with Props in imageDetail.jsx
If you've come this far, you really deserve a hug from me 😅🙃.
Let's move on ⚡⚡
So now, when we click on the Details button on our cards, we get redirected to a new page with the dynamic route path containing the name of the image.
In this section, we are going to use props to get the name we passed in the route path, and based on that name, we would find the object matching it, and display the content of the object as our detail on the page.
Replace the code in our imageDetail.jsx with this
import React, { Component } from "react";
import imageArr from "../imgArray";
import { Link } from "react-router-dom";

class ImageDetail extends Component {
  state = {
    details: {}
  };

  componentDidMount() {
    const name = this.props.match.params.name;
    const detail = imageArr.find(obj => obj.name === name);
    this.setState({ details: detail });
  }
  render() {
    return (
      <div>
        <div className="row mt-5 ml-3">
          <div className="col-sm-10 col-md-4 col-lg-4">
            <img src={this.state.details.image} width="100%" alt="" />
          </div>
          <div className="col-sm-10 col-md-4 col-lg-5">
            <div className="card">
              <div className="card-body">
                <div className="card-title">
                  <h2>{this.state.details.name}</h2>
                </div>
                <div className="card-title">
                  <h5>
                    Photographer: <b>{this.state.details.photographer}</b>
                  </h5>
                </div>
                <p>{this.state.details.description}</p>
                <Link className="btn btn-primary" to="/">
                  Go Back To Collection
                </Link>
              </div>
            </div>
          </div>
        </div>
      </div>
    );
  }
}

export default ImageDetail;
WE ARE DONE !!
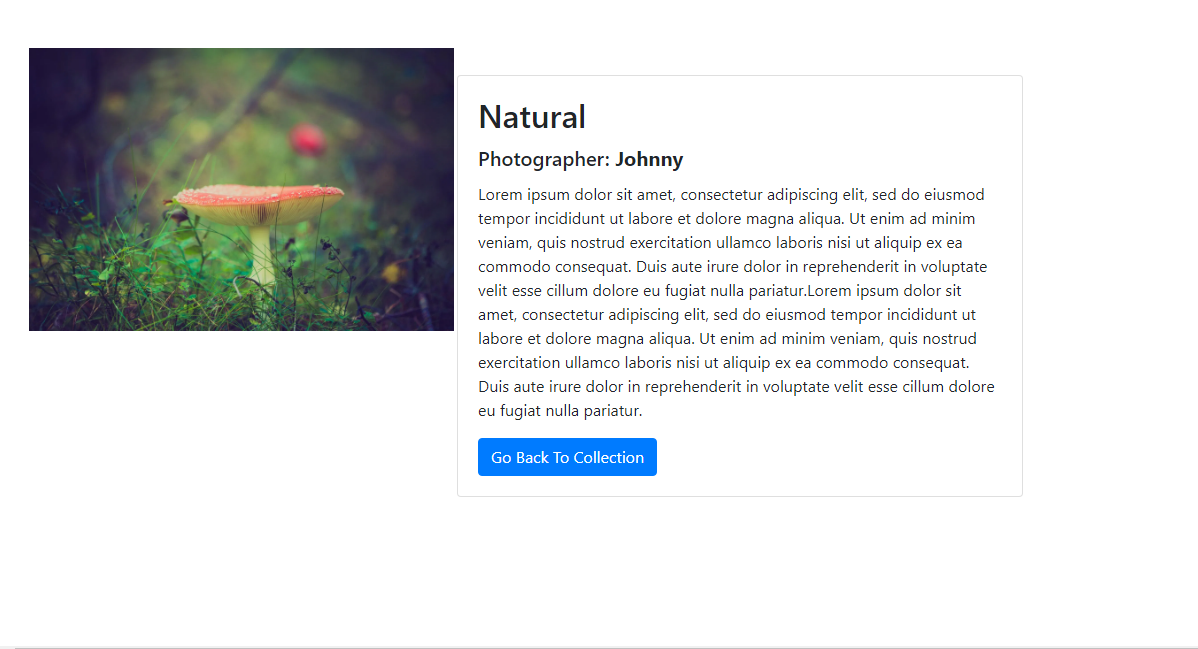
Now if you run the web application in your browser with npm start, you would be taken to the index.jsx page where you get to see all the images we have, arranged in a grid format. Try clicking on the Details button in the card and you will be taken to a dynamic page that displays dynamic content based on the image that was clicked on.
But Wait, What Exactly did we do in the imageDetail.jsx file? well, lucky for you, you have me to walk you through it.
- We created a basic React boilerplate and imported the necessary things we would be needing, including our image array, and the
Linkfromreact-router-domimport React, { Component } from "react"; import imageArr from "../imgArray"; import { Link } from "react-router-dom"; class ImageDetail extends Component { render() { --- return ( --- ) } } Next, we initialize a state inside the class we
ImageDetailclass we just created. Think of it, we would need somewhere to store our object when we get it, right? That's why we need a state. Here, we will store our object inside the detailsstate = { details: {} };Next, we use a life cycle hook called,
componentDidMount(). with this life cycle hook, we are able to perform an action once the component has been loaded.componentDidMount() { --- }Here's what we do immediately our component has been loaded:
If you recall, we passed the name of the image into the route path, this makes the name automatically available to us asprops. to confirm this, if youconsole.log(this.props)like this:componentDidMount() { console.log(this.props) }and head to our browser's console after clicking the Details button on the cards, you'll see something that looks like this:
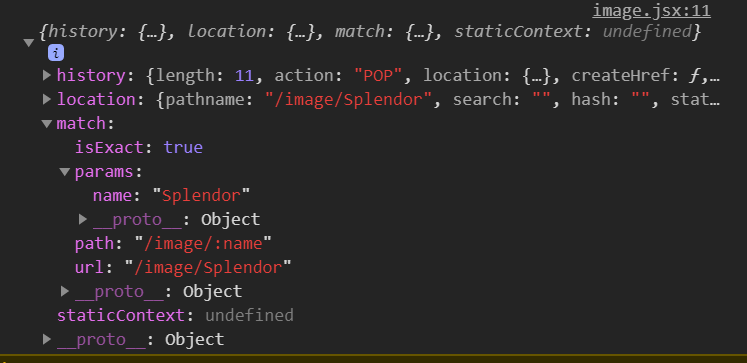 with this, you see that the
 nameis available inmatch.params.name
This brings us to the other things found inside thecomponentDidMount()
``` componentDidMount() { const name = this.props.match.params.name; const detail = imageArr.find(obj => obj.name === name); this.setState({ details: detail }); }
We brought out the name from props, then we used this name to search our imageArr to find an object that has this name, we did this by implementing the .find() array method. Then we use the setState() to set our details to the detail we just got.
Well after here, the rest is history. We just had to use bootstrap, create a 2 columns grid display, and get our unique values from the state.
And finally, add a button to link us back to the index.jsx page.
Sprinkle Some Css Love - Just Add Magic!
So here's what you should do:
Create a style.css file inside your src > pages folder and add the code below:
body{ margin: 0; padding: 0; } .index-container{ margin: 2% auto; position: relative; width: 80%; } .card{ margin-top: 5%; margin-bottom: 3%; margin-left: -5%; }
#index-title{ margin-bottom: 2%; background-color: rgb(37, 37, 37); color: white; padding: 2%; border-radius: 10px; }
Here's the look of our web application currantly:

Conclusion
From all this, we have seen that setting up dynamic routing in ReastJs is not really a difficult process.
One thing to take home would be that IT IS ALL JUST AN ILLUSION!!
this means that, from the outside, it looks like there are different routes and probably different pages for every image. Whereas what we are doing is simply manipulating the component based on actions performed. This opens a whole new world of possibilities, because your array may be from an API you've built or an external API, and anytime you add content to your database, your whole frontend adapts to your changes, creates dynamic routes, etc. without extra work.
> Don't forget to star this project on Github, follow me on twitter @iamdanieldon to connect with me outside here, leave comments and reactions, sincerely tell me how you feel, and
STAY SAFE!! >
Note: This article was first published in October 2019 on my personal blog. I'll try to make a newer version of this soon using hooks with functional components soon. If you have some knowledge of hooks, changing this up won't be too much to do for you.
LINKS
- view project on GitHub https://github.com/Chiagozielam/picture_viewer
- View the live project in an online code editor: https://codesandbox.io/s/github/Chiagozielam/picture_viewer
THANKS FOR READING!